Wednesday, February 7, 2018

Making a Press Pass

As part of the digital photography class, you will often be using your camera. This pass will allow you access to do so (with some restrictions!) First, you need to create one!

What you'll need:
-A photograph of yourself
-A Computer with Photoshop
-Template downloaded from classroom


Directions:

Open Photoshop
Sign into GoogleClassroom and download PressPass template

Open an image of yourself (a portrait, not a full length image)

Insert the image of yourself into the blank box on your press pass. You can use the crop tool, to get the size. Cut or Ctrl X will remove your photo and PASTE or Ctrl V to insert it where it needs to go.

Edit>Transform>Scale will allow you to resize your portrait (remember holding shift may hinder you if your pictures ratio does not match the box I've given you on template)

Add your FULL NAME and Grade to the right of your photograph. (USE TEXT TOOL T) Above the name of the school

Add YOUR GRADE as well (USE TEXT TOOL T) and choose appropriate font.

Lastly, add "2018" at the bottom of your press pass before the text "yearbook staff"

Layer> Flatten Layers when you are happy with the Press Pass

INSTRUCTIONS TO SAVE:

File > Save As > LastName_FirstName_PP  in MINOR folder in GOOGLEDRIVE
AND BE SURE YOU HAVE JPEG AS A FILE TYPE


This window will pop up:
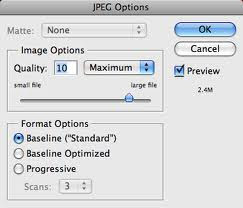

I generally save as LARGE file, to keep the quality.
POST to your blog titled "Press Pass"


YOU MUST EMAIL ME THE JPEG SO I CAN PRINT IT FOR YOU TO USE....

Thursday, February 1, 2018

Tuesday, January 30, 2018

FINAL EXAM REVIEW II


FINAL EXAM REVIEW III

Please click on the link, you will be directed to a practice digital photography exam- Press START when ready! TAKE NOTES! You will see these questions again on your final exam on February 1st or 2nd .

When you are finished with the exam, SCREEN SHOT your results and submit via GOOGLE CLASSROOM. 

Monday, January 29, 2018

Final Exam Review I


Please click on the link below, you will be directed to a practice digital photography exam- Press START when ready! TAKE NOTES! You will see these questions again on your final exam on February 1st or 2nd .


When you are finished with the exam, SCREEN SHOT your results and submit via GOOGLE CLASSROOM. 

Friday, January 26, 2018

FINAL EXAM REVIEW -Yearbook Questions


FINAL EXAM REVIEW- YEARBOOK QUESTIONS

Please click on the link, you will be directed to a practice digital photography exam- Press START when ready! TAKE NOTES! You will see these questions again on your final exam on February 1st or 2nd .

When you are finished with the exam, SCREEN SHOT your results and submit via GOOGLE CLASSROOM. 

Friday, January 19, 2018

Pegasus Cover Design (Literary Magazine)


Our school literary magazine comes out in the Spring. As art students, each of you will be required to submit (1) artwork and a cover design. See below for explanation:


Cover Design
Must have year 2017-2018
Must include the word "Pegasus"
Illustration, photo, sketch etc can be in color or black & white
Does not have to be an actual Pegasus, can be any image
Can be a digital or illustrated design
Should be sized 6"x 9" and 300 resolution

SUBMIT COVER DESIGNS ON GOOGLE CLASSROOM>>>>>>>>>>>> (the final jpeg)


THEN>>>>

Artwork Submission:
Each of you must submit your BEST work from this year
At least one piece, you may send others
Email good quality jpeg AS AN ATTACHMENT to rachael.rotella@woodbridge.k12.nj.us

  • Subject: Pegasus Submission
  • Message: First & Last Name, Grade, Title & Medium of piece
John Smith_12
"Self Portrait"
Digital Photography


Tuesday, January 16, 2018

Assignment: Multiple "Me's"


Multiply Yourself! 

Creating this assignment is a lot easier than it looks! First though, you'll need an idea. In class, we will be learning HOW to layer your photos and create one image, but outside of class you will need to take the time to create the photographs. 


Taking the Pictures

To make clones of yourself, put your camera on a tripod and take multiple pictures of yourself in different spots within the same scene. If your camera has a timer (shown next), start the timer, and then move in front of the camera so it takes a picture of you.
Choose a different pose for each picture. you can take pictures and then move in front of the camera before the shutter clicks. try to make your “characters” look like they’re interacting with each other by their facial expressions. Click the below images to download them so you can try it yourself!

Opening the Pictures as Layers

Open the files in Photoshop as layers, with one on top of the other. You can open multiple pictures as layers by selecting File | Scripts | Load Files Into Stack. You’ll see your photos as multiple layers within a single picture, as shown next. You can use more than two pictures.


DUE DATE:

You'll need to have your photos taken by the end of the week (1/19/18) and you will have until Wednesday 1/24/18) to get final image posted. I would like EVERYONE to post their final image to their blog followed by your original images. 


Thursday, January 11, 2018

Photoshop Tutorial: Removing the head


In this tutorial you learn how to remove someone’s head and replace it with object in the background. It does not only apply to heads but to all kinds of objects so you can remove them and replace with a background. See your GoogleClassroom for instructions and stock photos. 


Wednesday, January 10, 2018

Please Vote!


Great News!  Natasha, from JFK Memorial High School, has been selected as a finalist for this week's "Artist of the Week" award for the 10th-12th age group.  The finalist who receives the most online votes between now and Saturday January 13 will be selected as our "Artist of the Week." 

Please cast your vote for Natasha by clicking on the link below.  Voting is limited to one vote per computer per day !

The "Artist of the Week" will be featured on the Artsonia homepage and will receive a commemorative plaque from Artsonia.  In addition, Blick Art Materials has generously donated $100 gift certificates to the winning schools and $50 to the winning artists.

Tuesday, January 9, 2018

Assignment: Creating a business card


 As a student (or photographer!) you share many of the same attributes of someone in the business world. You may meet people in the course of a day whom you do not know and who do not know you. It is not always possible to spend a great deal of time talking with and getting to know the people you meet. Even when you do have time to talk, people are not always going to remember everything they learned about you.

People you see everyday — teachers, other students, parents, and family members — may not know things about you that you'd like them to know. When business people meet they exchange business cards. These small pieces of paper usually contain a person's name, the name of their business, social media accounts and a title or description of the work they do, and a way to contact the person, such as a phone number or address or website.


Task:
Create a business card for yourself. Your card should help others know and remember you. Ideally it should convey a sense of who you are, what you do, or your interests — cheerleader, history buff, teacher's assistant, class president, hall monitor, avid reader, or a photographer!

A business card generally focuses on a single facet of an individual or business. You may be a cheerleader who also raises rabbits and tutors younger students afterschool. Create a business card for just one of those aspects of your school life or extracurricular activities, or the life you WANT to lead when you are out of school.

Checklist: Many of the items in this list are optional. You must decide which ones are appropriate for your business card.

  • Name of Individual.
  • Name of Business or Organization.
  • Address.
  • Phone Number.
  • Email Address.
  • Web Page or Social Media Address (Twitter, IG, etc.).
  • Job Title of Individual.
  • Tagline or description of Business or Organization.
  • Logo.
  • Graphic Image(s) (including purely decorative elements).
  • List of services or products.

Additional  items listed below are to aid in designing your business card. Some may not apply:
  • Horizontal or Vertical Layout.
  • Emphasis on Business or Organization (name and/or logo).
  • Emphasis on Individual.
  • Emphasis on Title of Individual.
  • Emphasis on a particular part of the contact information (phone, address, email, etc.)
  • Size of Logo or other graphics — large (dominant) or small, etc.
  • Number of Colors.
  • White space (blank spaces) toward the middle or toward the outer edges.
  • Conservative typeface (such as those used in the stories in your textbooks) or Fun, Informal typeface (such as crooked letters, funny shapes, odd sizes, or type that looks like handwriting) or a mix.


Steps:
  1. First, decide what you want your business card to tell others. Do you want to focus on your activities with the Art Club or do you want to announce that you are class leader or that you are a skateboard enthusiast? It may help to list everything about yourself then pick one topic.
  2. Describe yourself. After deciding on what aspect of your school life or activities that you want to focus, make a list or write a description that tells about that part of your life.
  3. Decide if you want a "serious" or formal card or something more light-hearted or informal.
  4. Using the Business Card Checklist, list the major components of your business card. Mark out any components you wish to omit from your card. If appropriate, come up with a title for yourself. To put everything you want on this small card you may need to come up with different ways to say the same thing. Look for shorter words in place of long ones. Use a single word in place of two or three different ones. Experiment with abbreviations.
  5. Look at sample business cards. Identify those that have a style you might like to imitate or borrow, but DO NOT PLAGARIZE!
  6. Sketch out some rough ideas of how you want your business card to look — including any graphics you think you want to include.
  7. Using Photoshop, create a new Jpeg file, sized according to the specs below, 300 resolution, and 'transfer' your rough sketches to the computer.
  8. POST final buisness card design (front AND back if you have a back) on to blog


Evaluation:
When POSTing your card, attach the following questions to the post with your artist statement:
  1. What is the focal point of this business card? (What part is supposed to catch the reader's eye first?)
  2. What job, role, or activity does this business card describe?
  3. Is this supposed to be a formal (serious) or informal (casual) business card?
DUE THURSDAY 1/11/18


Monday, December 18, 2017

Assignment: Art Show Logo Contest

As you may have been informed, in lieu of our JFKMHS Art Show, we will be hosting a district show at Woodbridge Community Center on May 10.  JFK and WHS are competing to have students create a logo in their classes. The winner will have their logo used for the annual event as well as printed in the Woodbridge Corner and various flyers, etc advertising the show. 


Logo should contain the words:
Woodbridge Township
Celebration of the Arts
*Can contain the Kennedy and WHS logo, but doesn't have to.
*Celebration of the Arts should be the primary focus
* Please submit logo in PHOTOSHOP FORMAT via GOOGLEDRIVE

FILE MUST BE LABELED LASTNAME_JFK_ARTLOGO


DUE By:
January 9, 2018

Wednesday, December 13, 2017

Tutorial: Colorize an object in Black & White photo


Use this link to follow directions! You may use any color photo you have!


And here's what the selective color effect will look like with the overall image converted to black and white, leaving only the woman's red dress in color.

Thursday, December 7, 2017

Assignment: Famous Photographer Research

DO NOT PLAGIARIZE!!!!!!!!

This assignment is a way to become accustomed to writing about art, interpreting and analyzing artwork produced by prominent photographers throughout history.  Through this research you will become more familiar with an artist’s style, process, and technique.  Each of you will use this research as a source while completing a photo assignment by emulating your photographer’s unique style.

DO NOT PLAGIARIZE!!!!!!!!

You must sign up and commit to a photographer with Mrs. Rotella.  You cannot have the same photographer as anyone else in your class.  Please make sure these photos are school appropriate.


DO NOT PLAGIARIZE!!!!!!!!

Here link to lists of famous photographers: Link and Link
Here is the LINK to select your photographer form to let me know what photographer you will be using.


You will be creating is a blog post (Major) and a poster (Minor) to share with your classmates. 
You will have your blog post spelling and grammar checked and posted by 12/13/17 and your poster is due submitted via email AS AN ATTACHMENT to rachael.rotella@woodbridge.k12.nj.us

DO NOT PLAGIARIZE!!!!!!!!

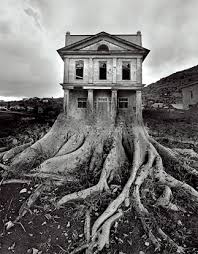
Jerry Uelsmann

Section 1:  Brief Biography

This section should include relevant information about the photographer, including when and where the photographer lived and produced art.  The biography should contain information relating to his or her artwork, as opposed to trivial facts.  Life events that influenced, changed, or made any sort of impact on the photographer’s artwork should be included in this biography.  Do not get overwhelmed with the little details of the photographer’s life.  Instead focus on the bigger picture – what shaped his or her unique style of taking and making photographs.

Untitled, 1982
 Section 2:  Artwork

This section should discuss style, process, techniques, common subject matter, and common themes of your photographer’s work.  Make sure to note if there are any significant shifts or changes in any of these elements throughout your artist’s life.    Discuss the different locations of their photography, who or what influenced their artwork, and most importantly discuss their UNIQUE STYLE.

Journey into Night, 2006

 Section 3:  Analysis

Select 5 specific photos completed by your photographer that you will like to investigate and discuss further.  Describe such things as composition, style, subject matter, concept and your thoughts and feeling.  Be specific.  These photographs will be the basis for your recreations.  Make sure you save clear copies of the selected photographs.

Section 4:  Plan

Write a plan of what you will do in order to create a poster in the photographer's style.  Be specific.  Describe the images, fonts, wording, etc.  YOUR POSTERS SHOULD HAVE A CLEAR CONNECTIONS TO THE PHOTOGRAPHER’S WORK. Work in 300 resolution, RGB and have image size be AT LEAST 13x19 inches.


DO NOT PLAGIARIZE!!!!!!!!

Friday, December 1, 2017

PS Tutorial: Pop Art Portrait


Using the LINK here, use a photo of yourself (or anyone, really) to make a Pop Art inspired portrait. YOU WILL POST TO YOUR BLOG FOR CREDIT. 


Tuesday, November 28, 2017

PS Tutorial: How To Use The Color Replacement Tool In Photoshop


Use this tutorial to learn how to use the color replacement tool. You may use these images from the internet or one of your own. Show me your finished piece for credit. I will need to see your HISTORY tab so I know you followed the tutorial. 

Monday, November 27, 2017

Assignment: Diptych with Interaction


Luiz Maurina, Dyptich "The Fighter" 2011
Thumbnail Drawings of your IDEA & model names DUE TOMORROW (Tuesday)
IMAGES DUE: Wednesday Dec 6th
Save as Last_First_Dyptich etc. in MAJOR folder and POST to blog

1. Read the artist statement & View the work of artist Richard Vantielcke below in your Major Assignments folder, or click on link - interactive images by Richard Vantielicke

Richard Vantielicke

2. Start formulating an idea, and choose your model or models. It does not have to be someone from our class. It can also be someone from home. You will have Thursday  - Monday to shoot this assignment. If you are absent, you will still be responsible for the shoot. You will have to set up your own makeshift studio at home, with a sheet and a window for light. The specific days will be assigned.
A final diptych in which one half of the diptych “interacts” with the other either by theme, movement, message or concept.


Richard Vantielicke

Other examples...
Dave Kimelberg is a Boston-based photographer, lawyer and general creative-type photographing tatooed professionals proving, at the very least, you should not judge a book by it's cover.

 Shubani Singh, Dyptich 2011

Elisa Sapolinick, Dyptich 2011


BLOCK 1 Studio Shooting Schedule:

Tuesday November 28, 2017
Brianna model: Ryne
Lara model: Ayah
Shannon  model: Areeba
Liani  model: Jenn
Hope model: Sam
Sam  model:Hope
JILL  model: Jenn

Wednesday November 29, 2017
JENNIFER model: jill
GABRIELA  model: Moh
MOH
AUSLIN model: Sergio or Martin
NIKHIL
LYLE

Thursday November 30, 2017
RYNE
ERNESTO model: Joel
JOEL
MARCELLA
AYAH  model: Lara

Friay Dec 1, 2017
AREEBA
SERGIO
RATANDEEP
KEVIN
MARTIN model: Auslin

BLOCK 4 Studio Shooting Schedule:

Tuesday November 28, 2017
PATEL, JAY
PAULIKAS, ASHLEY
KHAN, HANA
SHAH, ZAHRA
WOOTEN, KYAISHA
ABREU, LINDSEY
ALMONTE, NADEGE


Wednesday November 29, 2017
EL RASHIDY, HOSSAM
FERNANDEZ, CHELSEA
GARCED, MAVEN
HERNANDEZ, CHABELY
KAM, GABRIELLE JOYCE
SERNAQUE, MEYBOL

Thursday November 30, 2017

KHAN, MAHER
LOMBARDI, AMANDA
MCMAHON, HANNAH
MOTTA, DAKOTA
PASCALE, NICHOLAS
CLAIBORNE, BRITTANY
CLARKE, DASHAWN