Wednesday, February 7, 2018

Making a Press Pass

As part of the digital photography class, you will often be using your camera. This pass will allow you access to do so (with some restrictions!) First, you need to create one!

What you'll need:
-A photograph of yourself
-A Computer with Photoshop
-Template downloaded from classroom


Directions:

Open Photoshop
Sign into GoogleClassroom and download PressPass template

Open an image of yourself (a portrait, not a full length image)

Insert the image of yourself into the blank box on your press pass. You can use the crop tool, to get the size. Cut or Ctrl X will remove your photo and PASTE or Ctrl V to insert it where it needs to go.

Edit>Transform>Scale will allow you to resize your portrait (remember holding shift may hinder you if your pictures ratio does not match the box I've given you on template)

Add your FULL NAME and Grade to the right of your photograph. (USE TEXT TOOL T) Above the name of the school

Add YOUR GRADE as well (USE TEXT TOOL T) and choose appropriate font.

Lastly, add "2018" at the bottom of your press pass before the text "yearbook staff"

Layer> Flatten Layers when you are happy with the Press Pass

INSTRUCTIONS TO SAVE:

File > Save As > LastName_FirstName_PP  in MINOR folder in GOOGLEDRIVE
AND BE SURE YOU HAVE JPEG AS A FILE TYPE


This window will pop up:
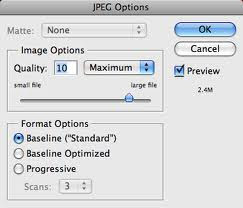

I generally save as LARGE file, to keep the quality.
POST to your blog titled "Press Pass"


YOU MUST EMAIL ME THE JPEG SO I CAN PRINT IT FOR YOU TO USE....

Thursday, February 1, 2018

Tuesday, January 30, 2018

FINAL EXAM REVIEW II


FINAL EXAM REVIEW III

Please click on the link, you will be directed to a practice digital photography exam- Press START when ready! TAKE NOTES! You will see these questions again on your final exam on February 1st or 2nd .

When you are finished with the exam, SCREEN SHOT your results and submit via GOOGLE CLASSROOM. 

Monday, January 29, 2018

Final Exam Review I


Please click on the link below, you will be directed to a practice digital photography exam- Press START when ready! TAKE NOTES! You will see these questions again on your final exam on February 1st or 2nd .


When you are finished with the exam, SCREEN SHOT your results and submit via GOOGLE CLASSROOM. 

Friday, January 26, 2018

FINAL EXAM REVIEW -Yearbook Questions


FINAL EXAM REVIEW- YEARBOOK QUESTIONS

Please click on the link, you will be directed to a practice digital photography exam- Press START when ready! TAKE NOTES! You will see these questions again on your final exam on February 1st or 2nd .

When you are finished with the exam, SCREEN SHOT your results and submit via GOOGLE CLASSROOM. 

Friday, January 19, 2018

Pegasus Cover Design (Literary Magazine)


Our school literary magazine comes out in the Spring. As art students, each of you will be required to submit (1) artwork and a cover design. See below for explanation:


Cover Design
Must have year 2017-2018
Must include the word "Pegasus"
Illustration, photo, sketch etc can be in color or black & white
Does not have to be an actual Pegasus, can be any image
Can be a digital or illustrated design
Should be sized 6"x 9" and 300 resolution

SUBMIT COVER DESIGNS ON GOOGLE CLASSROOM>>>>>>>>>>>> (the final jpeg)


THEN>>>>

Artwork Submission:
Each of you must submit your BEST work from this year
At least one piece, you may send others
Email good quality jpeg AS AN ATTACHMENT to rachael.rotella@woodbridge.k12.nj.us

  • Subject: Pegasus Submission
  • Message: First & Last Name, Grade, Title & Medium of piece
John Smith_12
"Self Portrait"
Digital Photography


Tuesday, January 16, 2018

Assignment: Multiple "Me's"


Multiply Yourself! 

Creating this assignment is a lot easier than it looks! First though, you'll need an idea. In class, we will be learning HOW to layer your photos and create one image, but outside of class you will need to take the time to create the photographs. 


Taking the Pictures

To make clones of yourself, put your camera on a tripod and take multiple pictures of yourself in different spots within the same scene. If your camera has a timer (shown next), start the timer, and then move in front of the camera so it takes a picture of you.
Choose a different pose for each picture. you can take pictures and then move in front of the camera before the shutter clicks. try to make your “characters” look like they’re interacting with each other by their facial expressions. Click the below images to download them so you can try it yourself!

Opening the Pictures as Layers

Open the files in Photoshop as layers, with one on top of the other. You can open multiple pictures as layers by selecting File | Scripts | Load Files Into Stack. You’ll see your photos as multiple layers within a single picture, as shown next. You can use more than two pictures.


DUE DATE:

You'll need to have your photos taken by the end of the week (1/19/18) and you will have until Wednesday 1/24/18) to get final image posted. I would like EVERYONE to post their final image to their blog followed by your original images.